DIY Gift Tags Using Right at Home Holiday Stamps
Hi there!
One of my favorite things to do around the holiday season, besides shopping, is preparing my presents with homemade gift wrap. Every year I change my gift wrap up slightly, however, I always stick to the familiar tones of kraft, cream, read, and a lime green, and this year is no different.
Today, I'm sharing three DIY gift tags with you that I created using my Right at Home Stamps Holiday collection. I may be a little biased, but I just love these stamps!
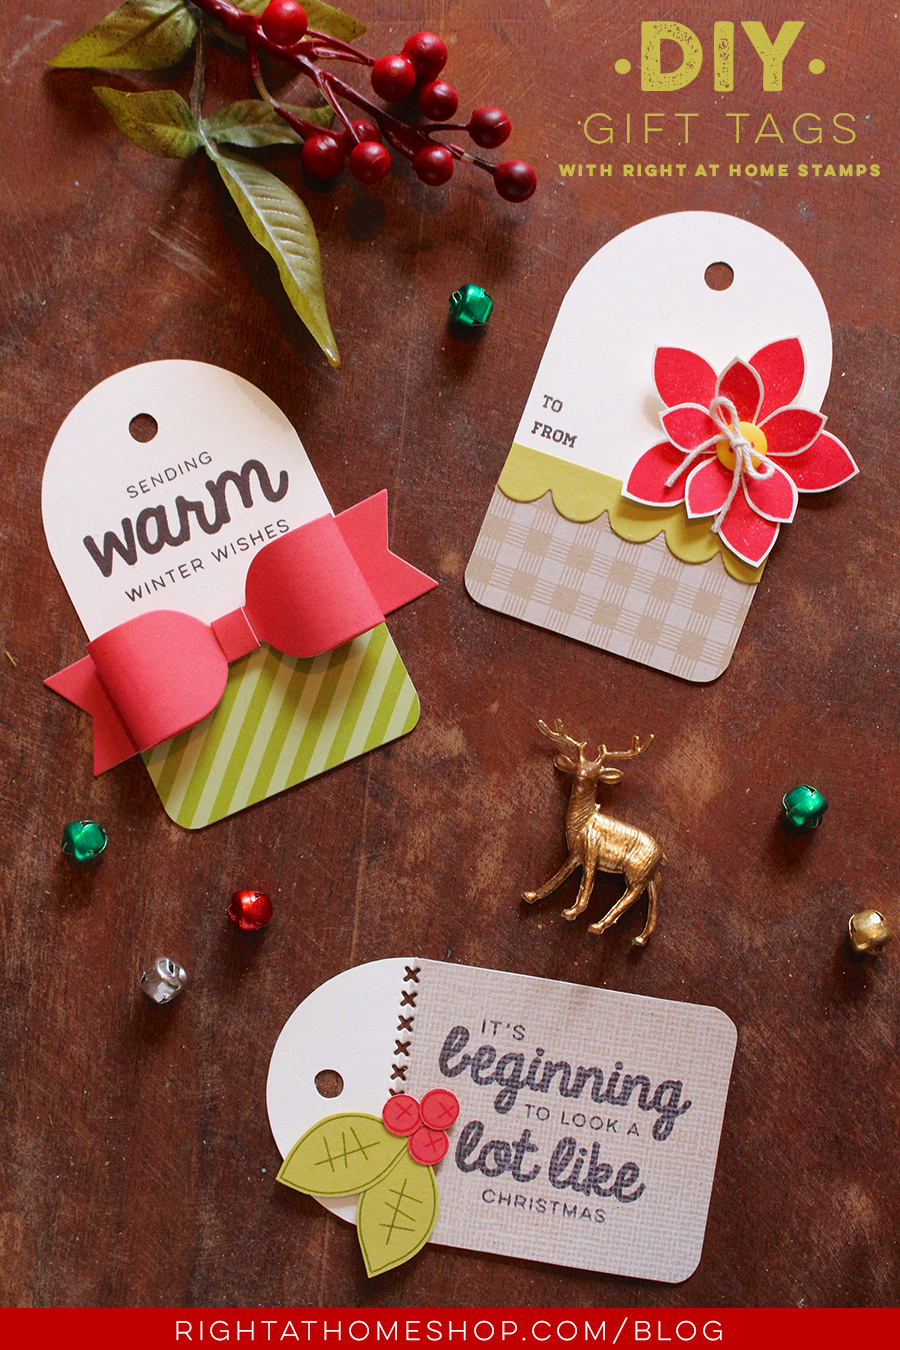
All three tags measure 2 1/5 in wide by about 4 in tall and were cut using my Silhouette Cameo.
Tag #1 // Sending Warm Winter Wishes
For my first tag, I knew I wanted to incorporate a paper bow so I grabbed some red paper and die-cut one using a My Favorite Things die. The die-set comes with two different sizes of bows and is seriously a must-have for holiday crafting. Below the tag I adhered some green striped paper to add a fun touch. Before I adhered the bow using Min Glue Dots, I stamped my greetings using my sentiments set in brown ink. Once I adhered the bow, I was finished!
Tag #2 // Poinsettia
This tag started with the idea to use my Poinsettia set to make a layered flower. I stamped both the smallest and largest poinsettia from my set in Lawn Fawn Lobster ink and trimmed them out with a slight border. I adhered them together and folded up the edges of the smallest flower to add depth and dimension. I also added a yellow button in the center to finish it off. For the rest of the tag, I stamped a piece of kraft paper with a background stamp with the Lawn Fawn Yeti Pigment Ink (seriously...this may be my new go-to pigment ink!) and added a green scalloped piece above. I stamped a "to" and "from" and I was finished!
Tag #3 // It's Beginning to Look a Lot Like Christmas
This tag is perhaps my most complex tag, but I know you can easily re-create it. I started with a kraft rectangle that covered a good portion of my tag. I knew I wanted to add some texture so I used that same Yeti ink and a background stamp from MFT. Overtop I used one of my sentiments in a brown ink. I love the way the texture still peeks through the brown ink! Next, I used a cross-stitching die to add some faux stitches to the left side. I also used my leaves, berries, and cross-hatch stamp from my Poinsettia sets to create the little holly bundle.

And those are my three tags! I hope you like what I created.
If you are interested in any of the products, you can see them here.
Let me know which tag is your favorite in the comments below!
Nicole